
iPhones are incredibly amazing when capturing moments through photos and videos.
While creating videos is fun, editing the clips to turn them into a masterpiece is even better.
With the technology available today, you don’t have to rely on powerful computers to edit videos, as it is accessible on mobile.
If you’re wondering how to edit videos on iPhone, we’ve listed all the best methods you can use.
How To Edit Videos on iPhone: Getting Started
Before knowing how to edit videos on iPhone, you must first have video editing tools installed on your device.
Everyone has different needs and tastes when it comes to creating videos.
People can also have varying time and monetary investments in using these video editing apps.
Here are the top iPhone apps you can use for video editing:
Video Editing Applications for iPhone Compared
| Video Editing App | Best For | Pre-installed? | Pricing |
| Apple Photos | Beginners | ✓ | Free |
| iMovie | Casual Video Editing | ✓ | Free |
| Adobe Premiere Rush | Adobe users, Intermediate users | ✖ | $9.99 per month |
| Lumafusion | YouTube | ✖ | $30 one-time purchase |
| Splice | Short Videos | ✖ | Free with limited features$9.99 per month |
Top 5 Video Editing Apps for iPhone and How to Use Them
Now that you’ve got the gist, let’s talk about each of these apps can help you produce quality videos using your Apple device.
1. Apple Photos

The iPhone Photos app is the default storage of photos and videos, and it comes pre-installed on all brand-new iPhones and iPads. Apple designed it to be the primary photo and video management and editing tool on all Apple devices.
If you’re thinking of a hassle-free way of editing videos without installing external software, then the Photos app is the best option.
How To Use Apple Photos
For best results, keep the Photos firmware to the latest version. While you can always download it from the Apple App Store, iPhones typically install the related updates in the background.
Navigating through the Photos app features is easy.
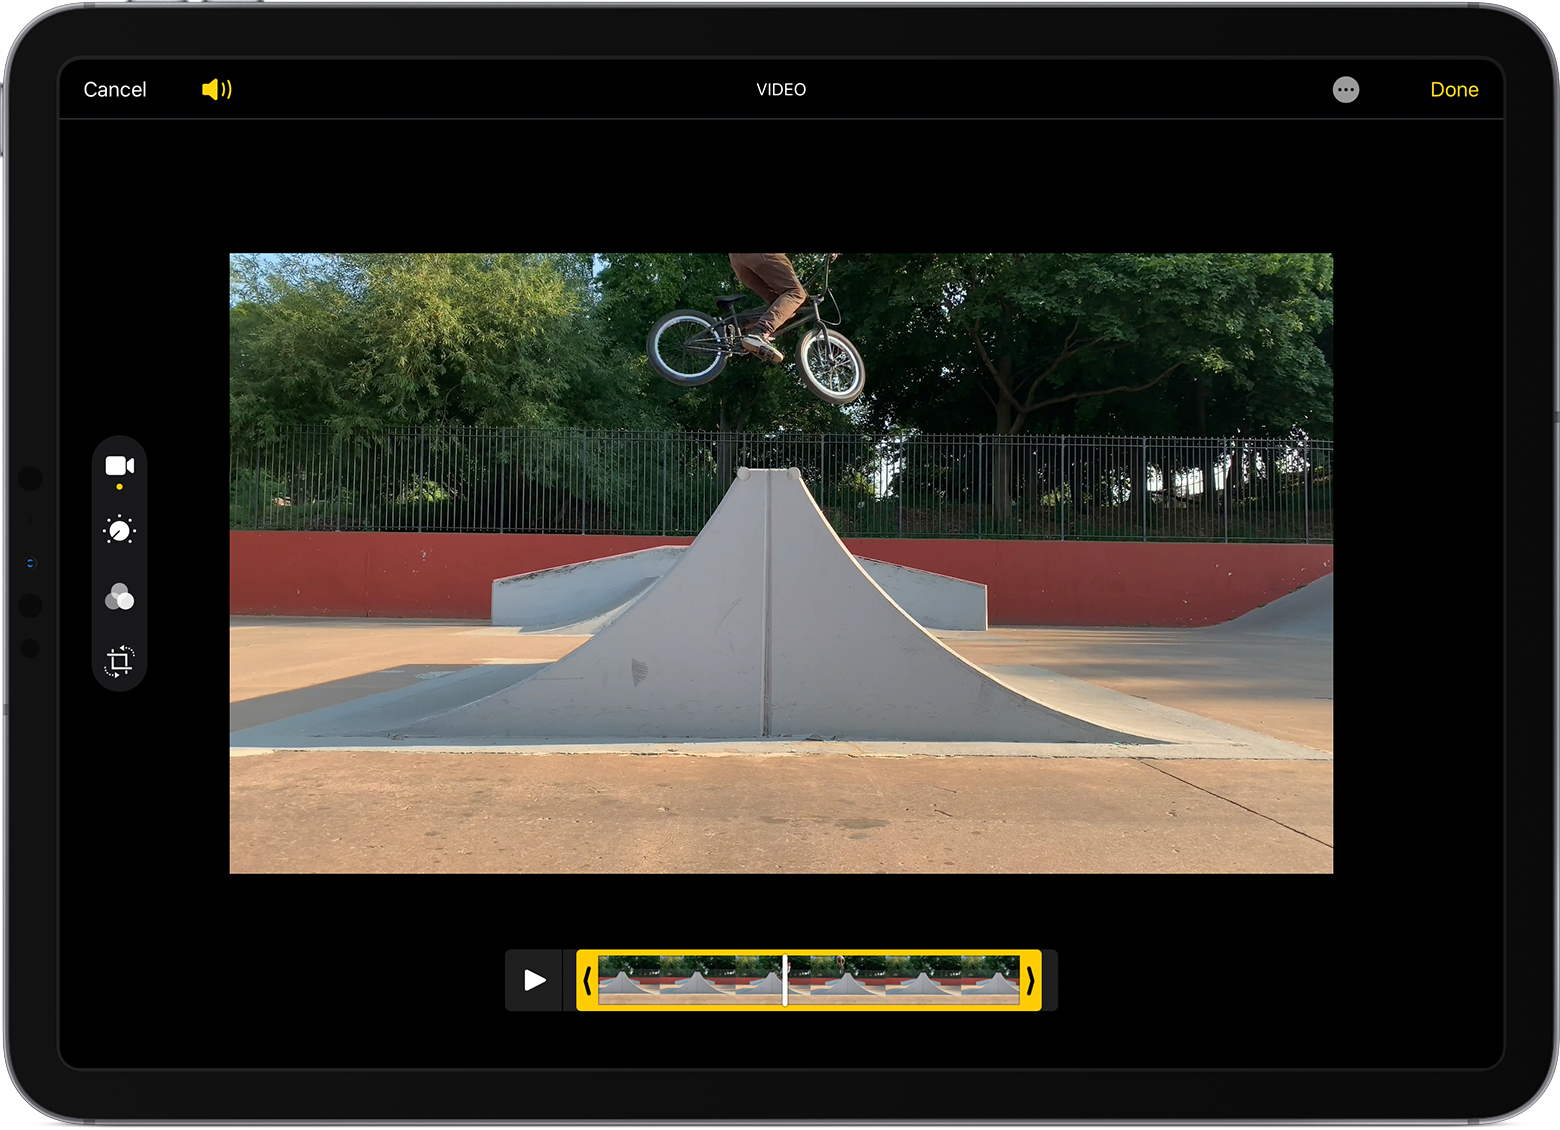
To get started, open the video you want to edit.
Depending on your device’s iOS version, you can find the Edit Button somewhere on your screen after tapping on the video while it’s playing.
Tap on the Edit Button to access all video editing features of the Photos App.
The video editing controls appear from left to right or top to bottom in the following order: trimming, adjustments, filters, and cropping and rotation.
- Trimming Videos
After tapping the Edit Button, a slider will appear at the bottom of the video. This means you have entered the Video Trimming Mode.
Look for the left and right arrows on the opposite ends of the slider, and drag each arrow to the desired trimming time.
If you’re unsure where to position the arrows for trimming, use the vertical bar between the arrows to locate the desired trimming position.
Click Done once you’re finished.
- Cropping Videos
Use the Crop feature by tapping on the bottom-most or right-most icon on the video editor, depending on where the icons are positioned.
The crop and rotation tool allows you to change the orientation and size of your video, enabling you to skew parts as desired.
You can use the dimension presets for your social media platform or the free-form option to crop it to your desired size.
- Using Filters
You can add an aesthetic look to your videos by using the Filter option next to the Crop icon.
Simply select a filter from the different selections available.
- Custom Adjustments
Sometimes, using filters isn’t enough to showcase the story of your videos.
You can use the custom adjustments right next to the trim video icon.
The Auto adjusts icon can improve the quality of your video by automatically adjusting its colors, brightness, and saturation.
To fine-tune the minor details, you can individually tweak these options using the sliders.
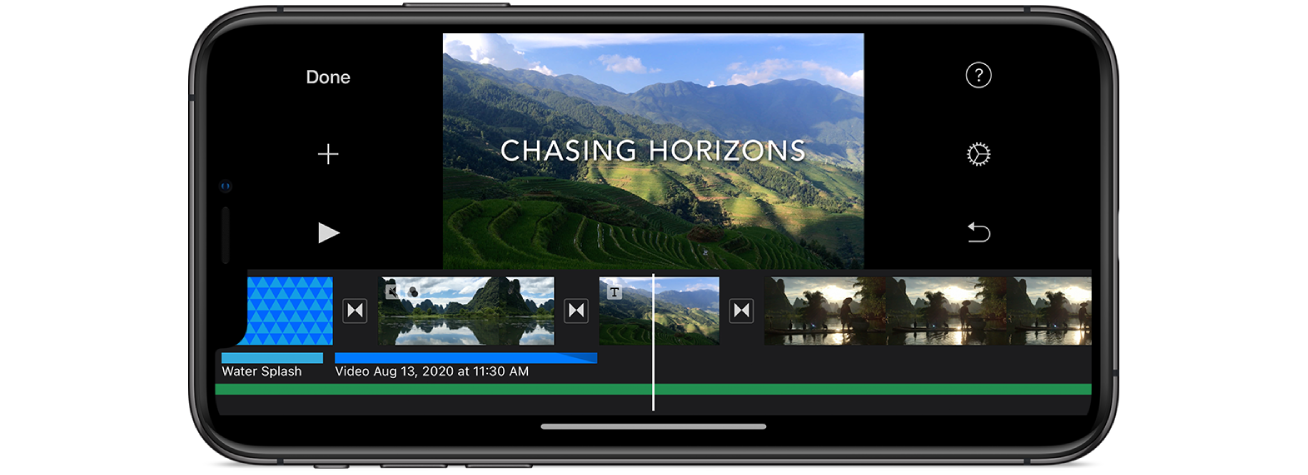
2. iMovie
iMovie is a free video player and editor for Apple devices. It is usually the first choice of beginners after transitioning from the Photos app.
It has a simple interface, which makes the learning curve easy, making it an excellent tool for simple video editing.
With high-end iPhone models equipped with powerful hardware, you can create beautiful 4k clips with ease.
There are three main types of videos that you can create using iMovie: Magic Movie, Storyboard, and Movie.
How To Use iMovie

iMovie comes pre-installed on all current iPhone models. Simply open the app to get things going.
- Importing Media
Create a project or an existing movie project and tap the Add Media icon.
You can add different photos and videos using iCloud and AirDrop, so make sure that you have these features usable on your device.
- Magic Movie Project
A Magic Movie Project uses all your chosen video clips and automatically turns them into professional-looking ones.
Click New Project, select Magic Movie from the list of options, choose clips you want to use for the project, and tap Create.
After that, you can tweak some options to create a better-looking movie.
- Storyboard Project
Storyboard Projects use video templates to create common videos based on genre.
Once you’ve clicked New Project, select Storyboard and find a suitable template for your movie project.
Click create and add relevant video clips or photos and captions or titles.
- Movie Project
Unlike other iMovie projects, a Movie Project lets you create iMovie videos from scratch without using templates.
After selecting New Project, click Movie and tap all the clips and photos you want to include in your editing timeline.
Once finished, tap Create Movie to edit videos.
You can add themes, filters, music, adjust video speed, and other professional video effects to your timeline.
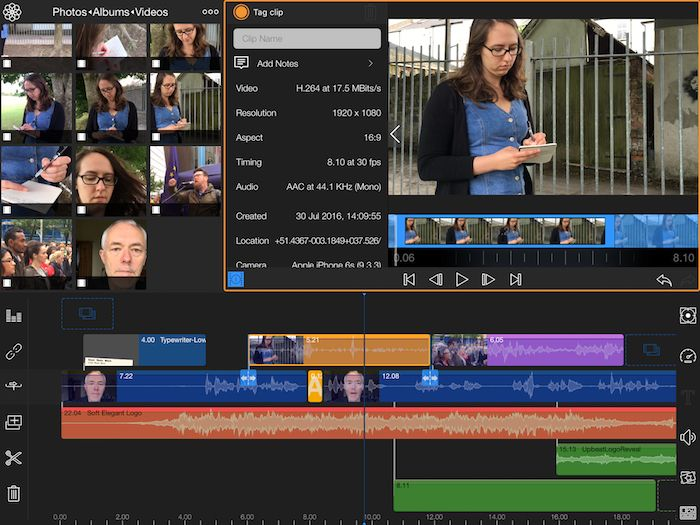
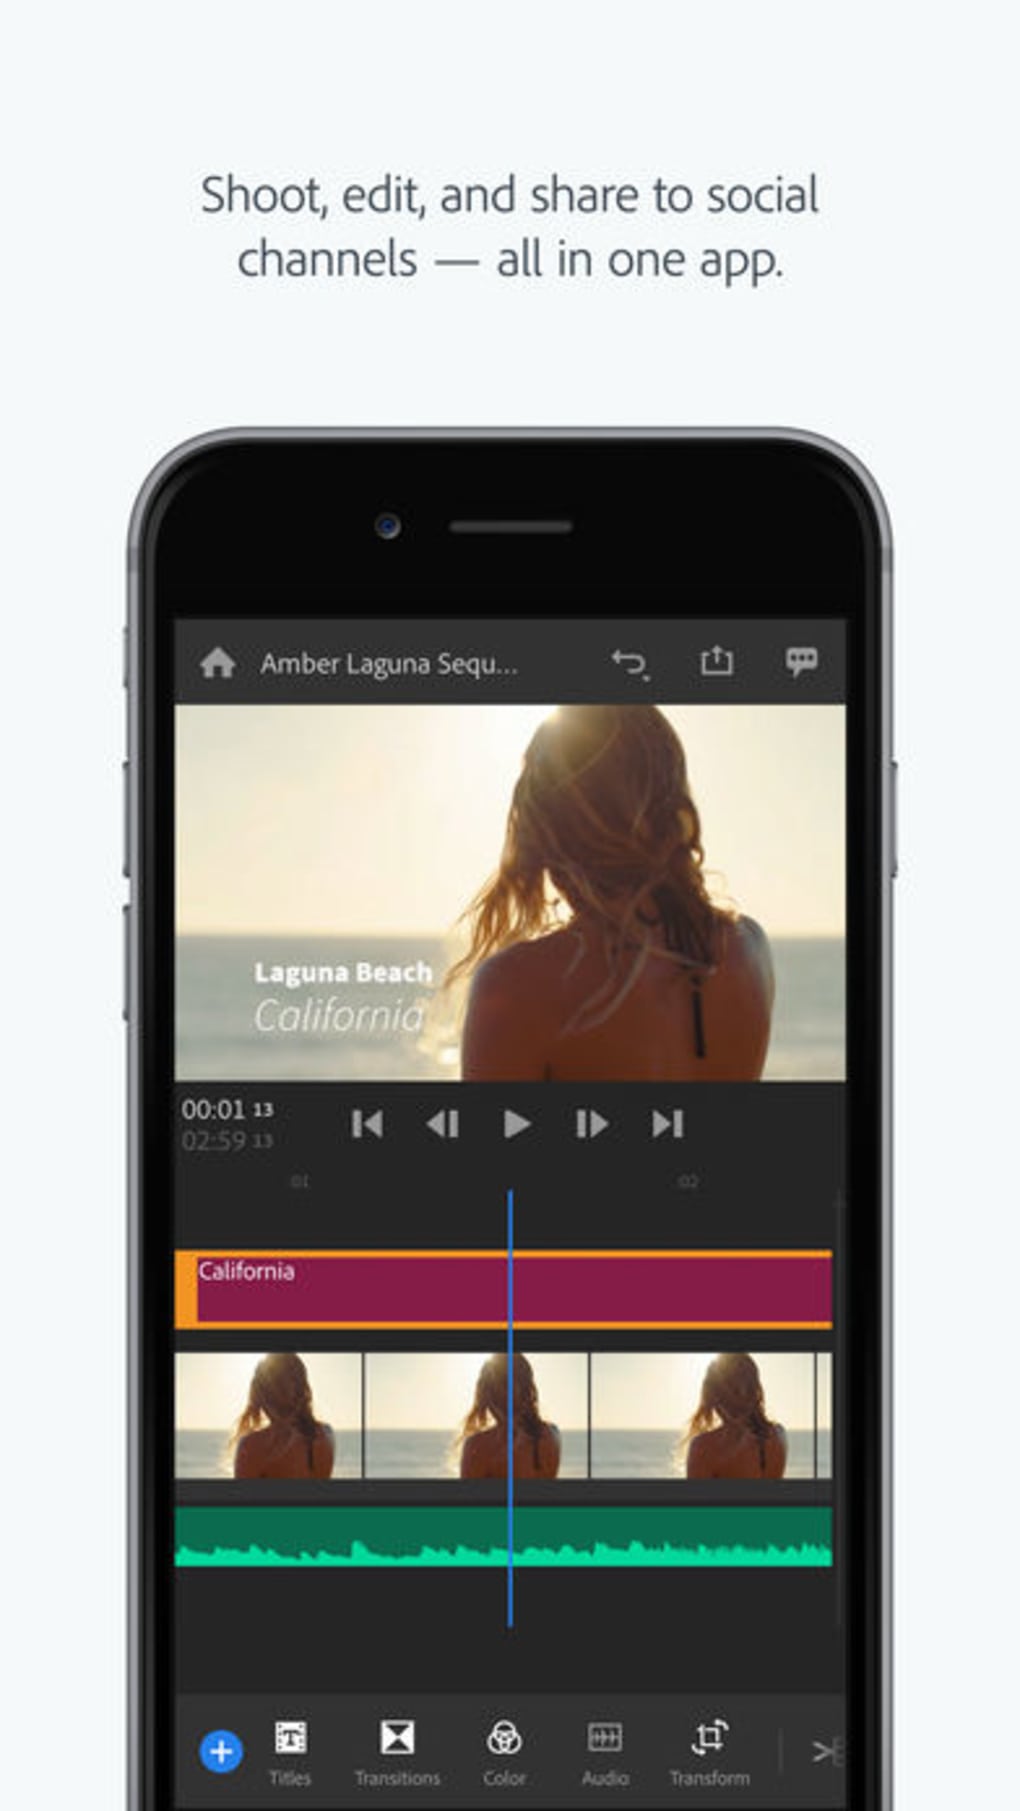
3. Adobe Premiere Rush
Adobe Premiere Rush is a must-have video editing app if you are an advanced video editor.
The app features a ton of tools and options so that you can create full HD quality videos on your iPhone.
Unlike other video editing tools, you can edit multiple videos at once without breaking a sweat.
How To Use Adobe Premiere Rush
To use Adobe Premiere Rush, download and install the app from the Apple App Store. Since it is a paid application, Adobe will require you to sign in using your Adobe ID, Google, or Facebook account.
Once you’ve completed the subscription process, you can use the app for the following:
- Adding Photos and Videos
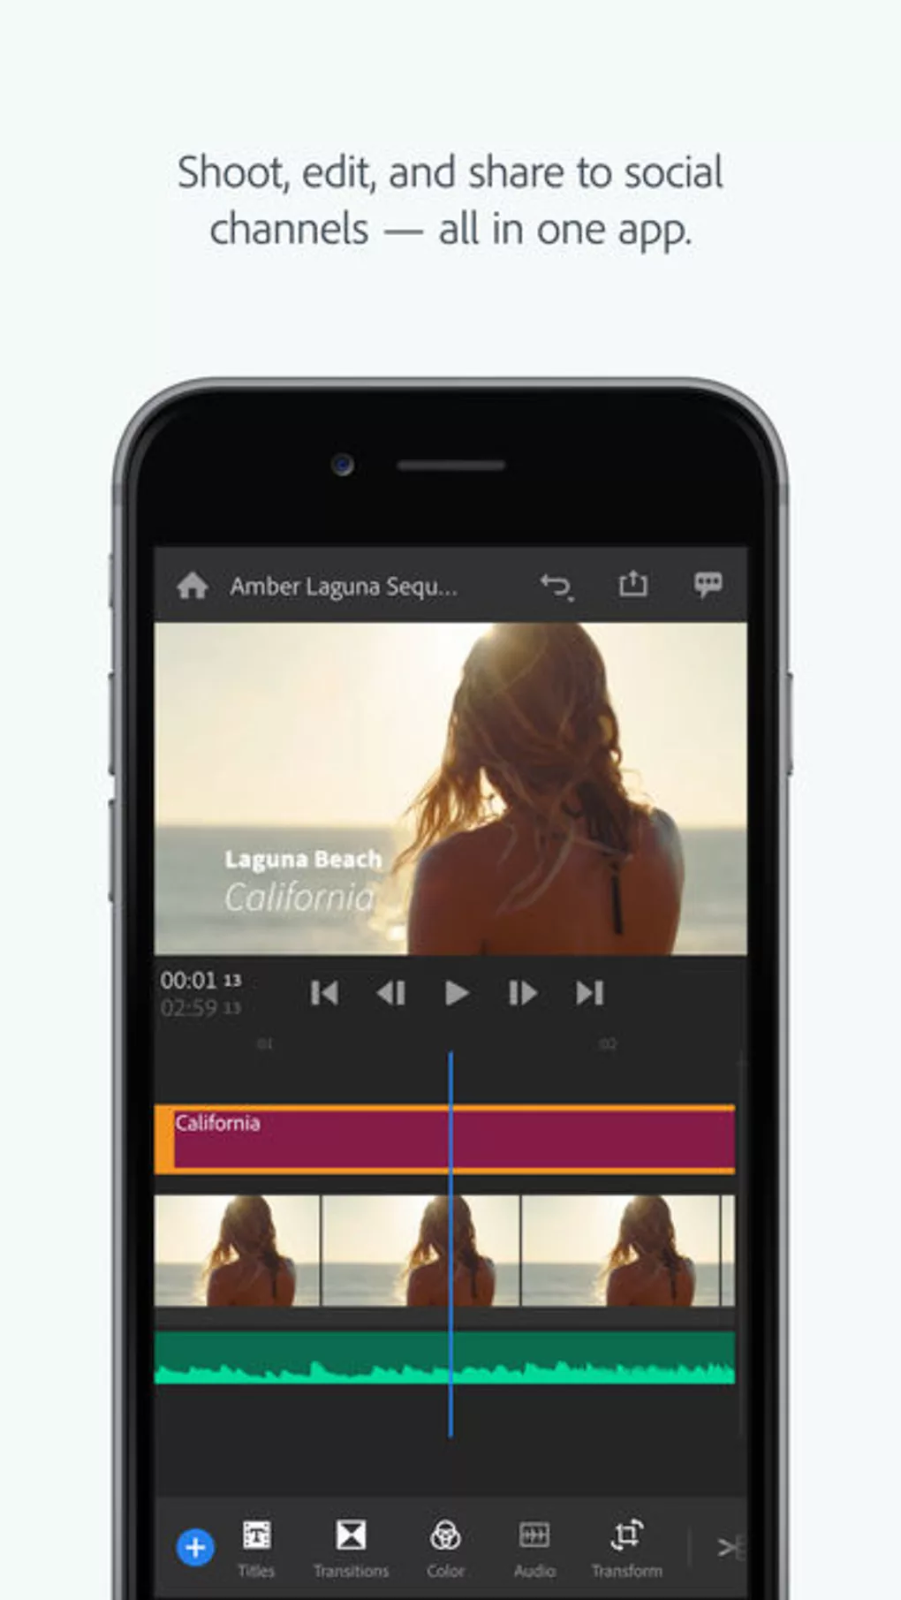
Once you’ve opened the app, you can add photos and videos using the Add Media icon.
- Capturing Media
Starting from scratch, you can choose the take video or photo option to record media.
Recording photos and videos are easy with Premiere Rush as it has different resolution and frame rate options.
- Trimming Clips
Select the clip you want to trim in one of the multiple video tracks and drag the orange handles from either end of the clip.
- Split, Duplicate, and Delete Clips
To split a clip, position the playhead in the area between the clip and select the Split option from the pop-up.
Additionally, you can select the Duplicate or Delete option if you want to create an extra copy or delete the clip from the timeline.
After splitting, duplicating, or deleting clips, you can freely drag the clips into the desired timeline positions.
- Graphics
One of the standout features of Premiere Rush is the ability to add graphics, overlays, transitions, and titles.
Simply click the add graphics icon from the timeline, and browse from the selection.
Drag the graphics to your desired clip and adjust its duration.
- Motion
If you have multiple clips that come at different ratios, you can automatically reframe them using the motion options.
Tap the Select Button, then Motion and Auto Reframe to create clips with the same ratio.
Premiere Rush uses motion tracking in reframing multiple clips.
- Color
Changing color is one of the most important tools in video editing, as it changes the viewer’s perspective.
To change the colors in Premiere Rush, select the Color icon and choose a preset suitable for your clip.
Some details that you can fine-tune in the colors tab are intensity, exposure, contrast, temperature, shadows, highlights, saturation, vibrance, and tint.
If you liked the manual changes you’ve created, you can save them as a preset by tapping Options, Create Preset, and Save.
- Speed
Select the video in the timeline and tap the Speed icon to create a fast or slo-mo video.
To change the speed of a specific portion of a video, tap the Range icon and adjust the slider.
- Audio
Add music to your clips by selecting the clips and tapping the Audio icon.
You can either add music from your device or the music library of Premiere Rush by searching using keywords.
- Transform
Unleash your creative mind by selecting the clip and tapping Transform.
Some options in the transform icon are Scale, Crop, Opacity, Rotation, and Edge Feather.
- Export
The export feature is convenient, as it can directly post your output on different social media channels, such as Facebook, YouTube, Instagram, and TikTok.
Simply tap on Share, adjust the quality settings, and export to your favorite social media platform.
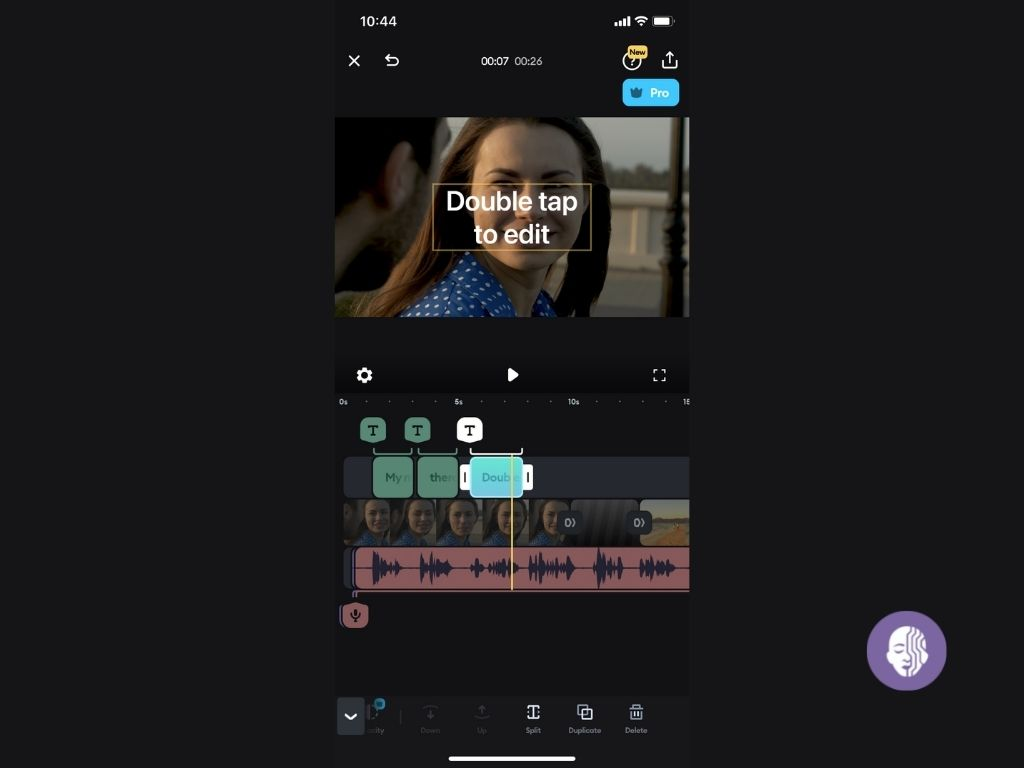
4. Lumafusion

Lumafusion is one of the most versatile video editing apps for iPhone since you can work on your projects in portrait or landscape orientation.
It also has an intuitive interface, so you can easily navigate the tools to create an entire video.
Even though it comes at a price in the app store, it has many users because of its efficient video editing features.
How To Use LumaFusion
To use Lumafusion, head to the App Store and look for paid video editor apps.
Once you’ve purchased the product, launch the application to get started.
- Creating a Project
Click the plus (+) icon at the bottom of the screen to create a project.
Enter your project title, frame rate, color space, and aspect ratio.
- Importing Media
Tap the top left panel to open the Import area. Select your media from your photo library and include them in the timeline.
If you are using videos with multiple angles, you can do so in the app, but you need to unlock them using in-app purchases.
- Trimming Footage
You can trim your clips in the timeline by dragging the arrow icons at the side of each clip to set their start and end.
Alternatively, you can drag the playhead on the specific part of your clip and trim that part using the scissors icon at the bottom.
Select the clip that you don’t need and simply press Delete.
- Titles and Text
Select the Plus (+) icon next to the scissors icon or click the Photo icon to open the titles and text tab.
Choose from the presets and drag it to where you want on the screen.
There are several sliders that you can play with to adjust the Size, Spacing, and Opacity of the text.
- Transitions
To add transitions and effects to your clips, select the Transitions Tab below the Titles icon.
Select a transition from the list and drag it to your clips.
- Audio
Select the Music icon underneath the Transitions tab and find relevant audio or music clips for your movie.
Use the scissors icon or the handles to trim your audio to a set amount.
Likewise, you can adjust each track’s volume in the timeline using the sliders.
- Color-Grading
Click Colors and Effects in the bottom panel to adjust the colors of your clips.
Select from the presets and fine-tune the details using the sliders in the menu.
- Exporting
Once you’re happy with your edited video, click the Export icon next to the settings in the bottom right corner.
You can adjust the export settings and directly save it in your photo library or directly upload it to YouTube.
5. Splice

Splice is one of the free video editing options you can use if you are on a budget.
This third-party software has several straightforward features that you can use.
Although it is free to use, it offers an upgrade to Splice Pro, wherein you can get access to better selections and features.
How To Use Splice
Install Splice using the App Store, launch it on your iPhone, and sign up to get started.
From the get-go, the software will ask you three things: your video editing level, your preferred social media platform, and what brings you to Splice.
- Starting a Project
Before importing any media, you must first input the title of your project and the preferred aspect ratio.
Click Create once finished.
- Trimming Videos
Similar to other editing apps, you can trim videos by dragging the ends of the clip to your preference.
Likewise, you can cut videos by adjusting the playhead and selecting the Split option.
- Overlays
Splice is extremely easy-to-use with overlays.
Simply drag your selected clip into the area where it says “drop here to turn into an overlay” and adjust the size of your videos.
- Filters, Masks, and Effects
Tap the desired clip, select Filters or Effects, and select from the list to apply in your video clip.
For masking videos, select the Mask icon and find different options, such as circle, line, rectangle, and mirror.
- Titles and Text
Select the Title icon at the bottom of the workspace and enter your desired text by double tapping the text box.
You can adjust the size of the text overlays by pinching the text to make it bigger or smaller.
- Audio
To add music to your videos, click the Music icon at the bottom of the screen and select the desired clips from your phone.
To access the music library from Splice, you must purchase the app’s pro version.
- Exporting
After you’ve finished video editing on your iPhone, you can select different export options from 540p to 4k resolution.
Additionally, you can adjust the frame rate from 24 to 60 frames per second, depending on your preference.
Which iPhone Video Editing App Is for You?
You can use many tools today to edit videos on your iPhone. Moreover, learning how to edit videos on iPhone is quick and simple.
Whichever app you prefer, familiarization with the controls is always vital.
Once you’ve chosen an app to edit videos, find the clips that you find interesting and turn them into something spectacular.
Send it to your friends, upload it to your socials, or simply save them as a great memory.
Editing Videos on iPhone FAQs
1. What Is the Best Free iPhone Video Editor?
iMovie is straightforward to use and already comes with an iPhone. It contains all the features that you’ll need to edit clips.
A notable feature about iMovie is that it doesn’t leave any watermark, unlike other video editing apps.
Since apple supports iMovie, you can guarantee that your app will continuously receive updates and remain compatible with your device.
2. What Are the Best Video Editing Apps for Short Videos?
Splice is great for short videos due to its fun and basic features.
This former GoPro app is beginner-friendly, with most users facing no issues in editing videos.
Once done editing the clips, you can directly export them to your favorite social platforms, such as TikTok and Instagram.
3. How Do I Undo a Trimmed Video?
If you are using the native iPhone photos app, simply open your trimmed video, and click edit.
Once you’re in the editing workspace, click the revert button to restore the original video.
4. What iPhone Model Do I Need To Edit Videos?
The iPhone 6 is a good reference point you can use to start editing videos.
All models after the iPhone 6 until the latest release will work with video editing apps.
While most apps are compatible with the latest iPhone, some native and third-party apps might not be compatible with older models.
5. What Video Editor Is the Best for Cross-Platform?
Adobe Premiere Rush packs incredible features that will make your content stand out.
It is cross-platform, meaning you can use it on a computer or a mobile device.
You can start out filming your video using your iPhone, then do a little editing, and finish it up on your computer.
If you are familiar with Adobe products or currently using their services, this app is your best bet for editing iPhone videos for YouTube.
6. What Should I Look For in an iPhone Video Editor?
Before you choose an iPhone video editing software, make a list of what you’ll need and compare them to our list.
Ideally, your video editing tools should have most, if not all, of the features you need.


